The short answer for how to plant container gardens is “put the plants in the soil and then water them.” Obviously, there are ways to make the job easier (or harder). Without going into detail on plant selection, which is the subject of numerous large books, here’s the procedure for planting any number of pots all at once.
Note that you’ll want to treat all the pots as one job. Complete step one (clean up) on ALL pots/containers and then go on to the next step.

- Clean up. Clear out last year’s debris – if you haven’t already. You want to remove all of the above ground debris and most of the former root ball. For medium to large pots, you do not have to remove all of the soil or the filler beneath the soil. You may have to dig to the bottom of the pot (depending on the size, of course) and pull out the old roots. Sometimes, when lifting the old plant material, the roots will pull everything out of the pot. When that happens, I then lay it on it’s side and scrape out any bark or other filler material from the bottoms that could be re-used. For small pots, all of the soil should be removed.
The plant debris can be placed in the yard waste containers provided by local trash collectors. In Fort Collins, soil is not allowed in the yard waste container. Soil and plant debris can all be taken to Hagemans/Ewing Materials for composting for a small fee. You can also add all of the debris to your home compost pile.
- Set up the irrigation. Place the pots where you like them and attach all of the irrigation tubing. Watch that some connectors look like T’s but are actually elbows (look closely and you can tell the difference). I prefer to run the irrigation tubing up through the drain hole in the bottom of the pot to be tidy, but you must then use pot risers or pot feet of some type to keep from pinching the tubing. Here is a brief tutorial on drip irrigation.
Here is a write up on how to program the hose end timer I favor. Install a new battery, program the timer, and then attach it to the spigot. Turn the spigot all the way on (counter-clockwise) and toggle the hose wye so the system has water. Wait before manually turning on the timer to watch for drips. Tighten the fittings if necessary.
Whether you have a hose-end timer or a zone on your sprinkler system, manually start the irrigation and watch that all of the pots are getting water with nothing squirting or dripping out randomly. Repair if necessary. Now drape the irrigation tubing out of the pots while filling the pots. The irrigation tubing with drip emitters should end up at the top of the soil.
- Add filler. Medium to large size pots can be partially filled with something besides potting soil. I prefer to use medium bark chips which are also organic. Fill the pot 1/3 to 1/2 full of the filler product.
- Prepare the soil.
- If there is decent soil left from last year, it will need to be re-hydrated. Use your hose with a spray nozzle. Keep the water flowing into the pot as you stir the soil with a trowel. Potting soil becomes hydrophobic when it dries out over the winter, so you must stir it to get the soil damp again. Try not to over-do it, the soil should be wet but not sodden.
- Fill the pots with new soil, all the way to the top. If it’s a new fill, press the soil down firmly so that it settles into the fill material, but do not pack it down. Then fill the soil to the top again. You want the top part of the soil to be light and fluffy for easy planting. I have used many types of potting soil, but my favorite is Fertilome Ultimate Potting Soil.
- Sprinkle slow-release fertilizer over the top. This is not required, but your flowers will reward you for the effort. My favorite is Osmocote Indoor and Outdoor OR Osmocote Bedding Plants. Follow the label instructions for any fertilizer you may choose.
- Plant. Finally! You’re halfway through the process before you actually get to start working with the plants! Sort out the plants according to your planting plan (if you have one), or just make the plan now by sorting the plants and setting them in or next to their designated containers. Setting all the plants out now means you just move from one pot to the next putting the plants in their pots.
When planting, start with the plant in the largest nursery pot. For all the other plants, it is easiest to plant the pot starting at one side and working to the other. Not all planters need to have the tallest plant in the center – sometimes a planter has a clear front and back.
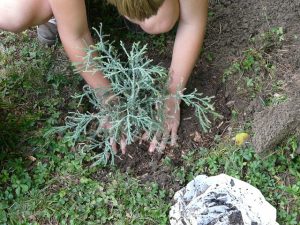
Use your fingers to create a well for the plant. Then remove the plant from its nursery pot and either tease apart the bottoms of the roots or just pull off the bottom tangle of roots. Press the plant into the well and push the soil around the base.
If you have irrigation, tuck the tubing in around the center plant – NOT around the very edge of the pot. Adjust the soil level (more or less) when you have just a plant or two left to tuck into the pot.
I typically stack all of the plant tags and poke them in on one side of the pot to remember what was planted there.
Save your back by sitting in a patio chair and just leaning forward while planting. This is much easier on your body than kneeling or bending over the pots.
- Clean up. No, you’re not really done yet but you probably have soil all over the place. Since dirt and water combine to make mud, you want to sweep up while it’s dry. Nursery pots are not recyclable.
- Water. Use the “shower” setting on a hose nozzle not the mist setting. Start by going around the edge of the pot pointing toward the center even if that means water is dripping down the side of the pot (which probably needs to be rinsed off anyway). This helps to keep the soil from running out of the pot. Water generously to remove all of the air bubbles. Look to see that you didn’t accidentally leave a void as the soil will sink away from the top and additional soil will be needed.
- Top dress the soil. I like to add small bark chips on top of the soil. This hides any irrigation tubing and also keeps soil from splashing onto the leaves when you water or if it rains. It’s not required and a thin layer is enough. Use gloves to avoid splinters.
- Sweep up again. It’s not really possible to add the small bark chips without dropping a few. You could also hose off the area or use your leaf blower instead of a broom.
- Admire your work!