First, start with a fresh 9V battery! It’s a good idea to label the battery with the year you installed it, but if you plan to install a new battery each year, don’t bother. One fresh 9V battery usually lasts the entire season.
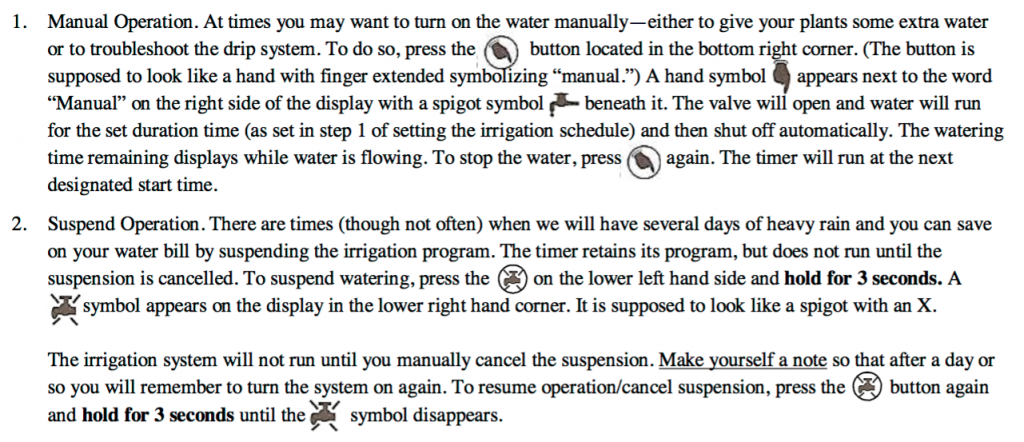
If your hose end timer is the DIG9001, is an aqua-green color, and looks like this picture, follow the instructions below.
If your timer is also DIG brand, but is gray in color, you’ll find the manual here.
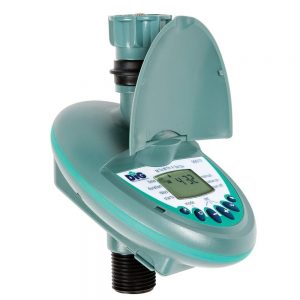
I like this timer because it runs on a 9V battery; the start times are set by the clock; is programmable down to one minute of run-time; and it will turn on and off up to four times each day. The timer is easy to program and adjust—if you can set a digital watch, you can set this timer.
Install the battery
Use a new 9V battery each year and you probably won’t need to replace it mid-season. (I have never had a dead battery problem.) The battery compartment is on the bottom of the timer. Pull to open; replace the compartment door by inserting the front first then snapping the back closed.
Set Current Time & Day
- When you install the battery a
 appears (it looks like a little clock) by the word “time” in the upper left corner and the either the hour digit or the entire display is blinking. If nothing is blinking, press the
  button.
 - Use the
 or
or  buttons to get to the current hour noting the AM or PM designation which appears to the left of the hour digit.
 - When you have the hour right, press the and the minute digit starts blinking. Again, use the or to get to the current time.
- Press the again and a blinking raindrop
 appears at the top of the screen underneath the printed “M Tu W Th…” Press the button until the raindrop is under the correct day. Press and the hour digit again begins to blink. Review that you have the correct time and day. If you do nothing, after about a minute the blinking stops and the time and date is set or you can continue immediately with setting the irrigation schedule.
If you need to reset the time without replacing/removing the battery, just press ![]() once, wait for the hour digit to blink and proceed with step 2 above.
once, wait for the hour digit to blink and proceed with step 2 above.
Setting the Irrigation Schedule
When I set up a irrigation system for container gardens, I start by watering twice each day for two minutes each time. This is just a starting point—the program can and should be altered depending on site conditions (sunny, shady, windy, etc.) and weather (more water is often required in July and August). In this example, I’ll set the timer to water twice each day for two minutes but you’ll also see how to change the program.
- Program the watering duration (how long the water will run each time it turns on).
Press and an hourglass
  symbol appears next to the word “duration” on the left hand side. The current setting is displayed and the hour digit is blinking. Since we want the water to run for zero hours and two minutes, we leave the hour digit at 0 and press so the minute digit blinks. Use the or buttons to set the minutes to :02 (or whatever watering time you need). Press and the hour digit again blinks; press to continue.
 - Set the days of the week when you want to water.
A little calendar appears next to the word “days” and a blinking raindrop appears under the M at the top of the display. To set the timer to run every single day, press the button seven (7) times. A raindrop then appears under each day of the week at the top. If you wanted to water only M-W-F, you would only press the when the raindrop is under those days. To add or remove a day, move the blinking raindrop using the then press the or buttons. A solid raindrop under the day of the week indicates it will water that day. Press to continue.
 - Set the irrigation start times.
The little calendar continues to display and “START I” appears next to “Starts” on the left side. Initially the word “OFF” will be blinking on the display. Here we will set two start times. Begin by pressing the and the “OFF” on the display changes to “12:00 AM” with the hour digit blinking. Continue pressing until you are at the hour you want the watering to begin noting the AM/FM indicator. I generally water each morning at around 7:00 AM. If you don’t want to water right on the hour, press the so the minutes digit is flashing and set this to the time you want to water using the or buttons.Press so that “START II” appears and again the display has the word “OFF” blinking on it. Following the same idea, press and the “OFF” changes to “12:00 AM.” Press the to reach the second start time. I usually set this around 4:00 PM. Again, if you don’t want to water right on the hour, press the so the minutes digit is flashing and set this to the time you want to water using the or buttons.Press again and “START III” is illuminated; press once more and “START IV” displays. You can leave these both at “OFF”, or set to an evening start time if you need additional water for the heat of summer.Press to exit the programming mode. The display shows the current day and time and it now set to run at the next start time. Don’t forget that your spigot must be turned all the way on, and left on, or there will be no water!NOTE: If at any time during programming you stop for more than a minute, the timer will revert to displaying the current day and time. Press until you return to the step where you left off.
Reviewing the Program
If you want to check or change the program, press the ![]() to scroll through duration, days and all four start times.
to scroll through duration, days and all four start times.
Manual Operation and Program Suspension
Once the timer is set, it will continue as programmed without intervention. There are two remaining buttons which are used for manual operation or to suspend the program.
Other
A blinking battery icon ![]() appears when the battery is low. Generally, a new 9V battery will last the entire season. If the timer is not functioning properly, check if the battery needs replacement.
appears when the battery is low. Generally, a new 9V battery will last the entire season. If the timer is not functioning properly, check if the battery needs replacement.
The display will show “noPr” when there are no days active in the watering schedule. If no irrigation days are selected, the timer will not run even for manual operation.
GREAT JOB! You’ve programmed your timer!
If you need help, run into an unexpected problem or need parts, please feel free to call me, Stephanie Selig, (970) 988-3808.
